Monday, September 9, 2013
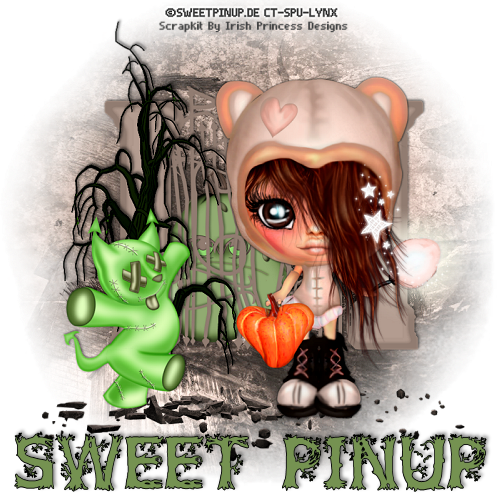
It Is Halloween
This
tutorial is my creation,
any
resemblance to any other is coincidence and not intentional
Written:
09/09/13
For
this Tutorial I am using the work of
If
using these tubes make sure you have the proper licenses.
Scrap
kit “Frankenstein Kisses”
is
PTU by "Irish
Princess Designs”
Use
Mask of choice
The
Mask I am using is MontiCircleMask
You
can find it at “Monti's
Pixel Playground”
You
will need no Filters
Lets
get started …
Open
New Image 800 x 800 Transparent
Open
IPD_FK Paper 6
Copy
– paste as new layer.
Layers
– Load/Save Mask -Load Mask From Disk
Layers
– Merge – Merge Group
Rename
Mask Layer
Add
Tube Resize if needed
Highlight
your Mask layer
Open
Elements
IPD_FK
Trees
IPD_FK
Gourd
IPD_FK
Gate -Resize 75%
IPD_FK
Tree – Move to the left
IPD_FK
Dirt
IPD_FK
Ted -Resize 50% - Mirror move to the left
Close
out of your layer make
Merge
Visible
Drop
Shadow
V
:-2
H
: 2
Opacity:
45%
Blur:
5.00
Now
new layer and add you copyright info. and your name.
Merge
visible
Resize
your tag I resized mine to 500 x 500
Adjust
– Sharpen
Would
love to see your results.
...............................................................................
Subscribe to:
Post Comments
(Atom)
Translate
Search
♥Blog Archive♥
-
▼
2013
(399)
-
▼
September
(44)
- BCA CT Tag
- Gothic Faerie
- CT Tutorial - Total Madness
- Elventale001 fairy by Fania Love
- Cute N Skully Tutorial
- CT N°12 "LLEGA NOCHE DE BRUJAS"
- PTU - Creapy Goth Girl
- TUTORIAL N°11 "FANTASTICA FRANKY"
- Bewitching
- Cute Spook
- SteamPunk Autumn
- DayDream
- It is Halloween Time 2 & Magical Touch
- New Kit - Harvest Wish
- The Mask
- Missing Angel
- CT N°10 "BABY WITCH"
- CT Tut with "Teresa"
- PTU - Fantasy Land
- Colorful
- Beautiful Witch
- Fairy Fun
- Love
- Punkie
- Will Spook for Treats
- .•.εїз PTU- Autumn Melody.•.εїз
- Baking Day
- Twisted Sister: CT Tutorial
- CT N°9 "JARDIN FANTASTICO"
- IS IT HALLOWEEN YET
- Autumn In your Eyes Animated Tag
- It is Halloween Time [PU]
- °°°CT Tag Creepy Cute°°°
- It Is Halloween
- Little Fairy [CU] & City of Fantasy
- 2 New Tags
- Love Lana
- Lovely Jax
- PTU - Autumn Fairy
- CT Tut featuring "Rock Baby"
- Autumn Harvest Extras
- PTU - Little Vampy Girl
- Lemonade Stand
- You Say I'm Wicked
-
▼
September
(44)
Powered by Blogger.
Where To Find It
- $1 sale (1)
- Akira Creation (17)
- Animated Tag (27)
- Animated Tuts (14)
- April/May Contest Tags (13)
- Arizona (4)
- Arizona Dreams (2)
- Batschis PoserDesign (3)
- Bella's Design's (2)
- Butterflydzines (13)
- chickcutiepie (6)
- Chiichanny (2)
- Claudia's Creationz (18)
- ClaudiaPsP (17)
- Cluster Frame (3)
- Contest (17)
- CrazYmuM (2)
- CT Tag (13)
- Daniela.E (3)
- Deadly Desire Tagz (9)
- Denise Creationz (6)
- DigiMania (3)
- Diry Art Designs (27)
- Diva Designz (1)
- Donnalee (6)
- DRAN Design (3)
- Dreamworld (3)
- Dunart (9)
- EricaWilma Sensibility (3)
- Evelyn (15)
- Evol Angel Scrapz (1)
- Exclusive (1)
- Extras (44)
- Fania-Love (3)
- Felice Originals (2)
- Filaz Tube (2)
- FTU Kits (4)
- Gigi Créations (36)
- Ginnibug Designz (1)
- Halloween (4)
- Irish (1)
- Irish Princess Designs (2)
- Irish Princess Designz (1)
- Jazzed Up Junk (7)
- Jenn's Designs (2)
- Jenny's Designz (11)
- Kissed By Kelz (1)
- Kissing Kate (12)
- Kizzed by Kelz (3)
- LadyDragus (24)
- Lynx (26)
- Medusa Creations (2)
- Melinou MeliCrea (41)
- MellieBeans Kits (1)
- Mimi Doll (1)
- Monique (1)
- Naughty Angel (49)
- naughty Angels Creations (1)
- Nina's Graphix (3)
- Nitta (32)
- png tag (7)
- PTU Kit (9)
- Purple Dreams Scraps (2)
- Redneck Tuts by Savage (6)
- Rissa (1)
- Rissa's Designs (2)
- Robynes Elegant Designs (13)
- Rose Creationz (65)
- Sassy Cream (1)
- Scrapjoy Kits (2)
- Scribbles (8)
- signature tags (2)
- Silvi Mis Pasitos (50)
- souldesigner (1)
- Special Event (6)
- Springtime Contest Tags (14)
- Stalked by Stayyseee (13)
- Stalked Inspirationz By Stayyseee (7)
- Starz Creationz (6)
- sweet pin-up (18)
- tag (38)
- Tanith (9)
- Tresors De Baby (4)
- Tutorial (10)
- Tuts (54)
- wallpaper (1)
- Wendy G (1)


0 comments:
Post a Comment